
Week 2 | Spring 2021 ORC | Floors
CATEGORY
5/12/2021
POSTED
Week 2 | Spring 2021 ORC | Floors
We’re on week two of the One Room Challenge and things are moving along! If you haven’t check out my post with my plans for this room, you can read that here! This past week, I focused on finishing up the floors in the boys room! We had a little bit of sanding left to do around the edges and a few spots to patch where we opened up closets and then I was able to get it all stained and sealed!
Just to be super clear: we started sanding these floors down 6 weeks ago. So don’t be fooled into thinking this was a quick week-long process. Maybe that’s possible if you work all day every day for a week! We just worked on the weekends when we had babysitting so it was a pretty slow and a little bit painful process.
We are by no means, floor refinishing experts. So, I can’t really tell you how to do this all properly, but I will share our experience, the mistakes we made, and what we learned along the way!
Sanding
Our floors were completely covered in gunk, paint, and residue from having carpet over it for an unknown amount of years so we weren’t really sure what kind of flooring we had under there until we started sanding. We found out fairly quickly we have yellow pine floors! Because they are yellow pine, the resin built up super quick on the sand paper and we blew through a TON! And if we didn’t change it frequently, the resin would melt and smear across the floors. So, if you’re refinishing pine floors, just be prepared for that.

We started off using a drum sander and an edger (both we rented from Menards) to sand which went alright but the edger was pretty challenging for even Paul to control. He compared it to wrestling a bear, haha! The drum sander did a good job, but you have to be really careful to always keep it moving otherwise you’ll sand a nice dent right into your floor which we may have done once or twice…

I spent a good bit of time getting the extra paint and tar-like stuff off the edges of all the rooms and the low spots where the sanders couldn’t reach. A combination of mineral spirits and a paint scraper worked the best for this job. I would go around the room and use a sponge to get mineral spirits on all of the spots and then let it sit for about 10-15 minutes and then go back and scrape it up. Be sure to open some windows because even with the low odor mineral spirits, it gets pretty stinky!
The last round of sanding, we switched to this big orbital sander and it was so much easier and covered a lot more ground! I would definitely recommend going that route if you decide to give refinishing your floors a try. It did weigh about a million pounds, so getting it up and down the stairs wasn’t fun. But, its was worth the effort! I wish we would have started with that one. I used our mouse sander to get all of the corners that the big orbital sander couldn’t reach and then we were ready for stain!
Staining
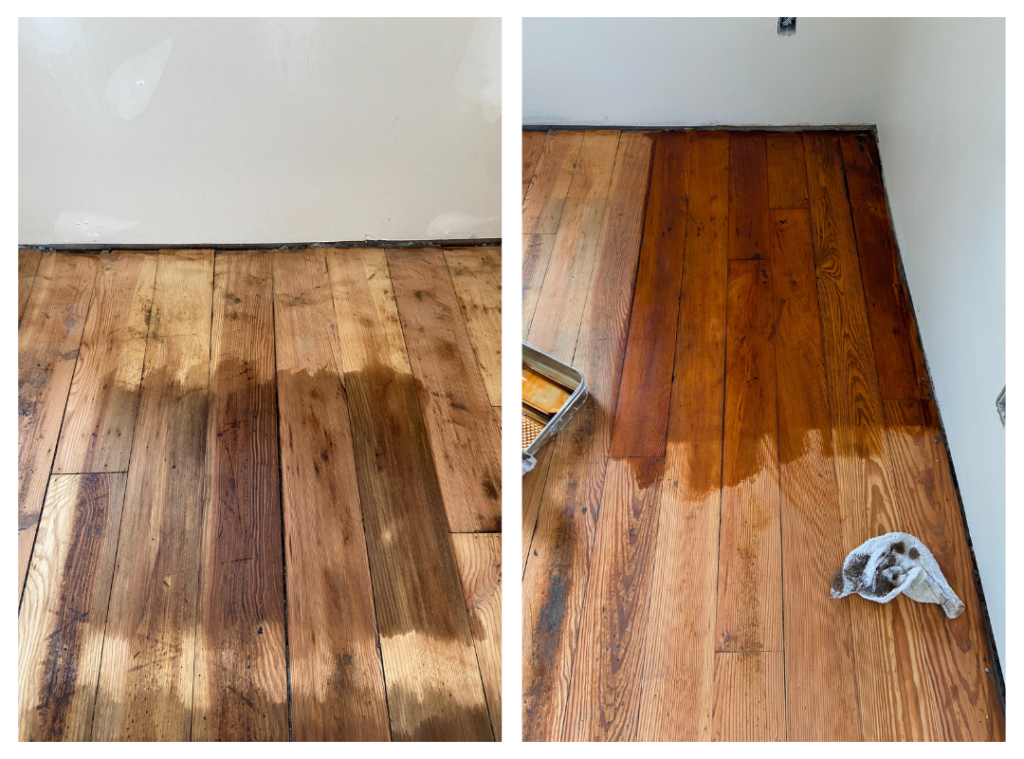
Here’s a little quick tip for you on stain: Brand matters when it comes to color!!! I had used all Minwax when I tested out stains early on and settled on a thinned out Provincial (above left). Well, when I went to get my quart of stain, I wasn’t seeing it so I grabbed the Varathane Provincial… big mistake! Holy cow, it was not even close to the Minwax color. I had a mini heart attack when I started staining… it was very orange (above right). Thankfully, Paul sanded it back down for me while I drove back to the store to get the correct stain! Moral of the story: use the same brand you test with.
The second time around, I tried using one of those sanding pads on an extension pole… again, I wasn’t happy with the color. I decided to just apply the stain the same exact way I tested it which was on my hands and knees with a rag. Poor Paul had to lug the sander up the stairs again and sand the floors down one more time for me. I did bring some Pringles and Twizzlers as a peace offering for him. I think he agrees that it was worth it because we both love the color they turned out! At least, he says he does. I’m pretty sure even if he didn’t like it, he would say he does to avoid sanding again. And I don’t blame him, haha! I don’t know how flooring guys to it all day every day. There’s a good reason it costs so much money to get your floors refinished!


Sealing
To seal them, I used the Varathane Interior Water-Base Crystal Clear Wood Floor Finish Poly in Satin. From what I understand, this will not yellow over time like an oil base. And I’m hoping it holds up well even though it’s water based! It says its a special “High-Traffic” formula so we’ll see! I’ll try to remember to report back in a year or so on how they hold up! So far, I’ve done three coats. We plan on doing a 4th but are waiting until our other floors are installed. Then we’ll buff everything at once before we put on one last coat!
We put down one coat of poly three consecutive evenings so they had a solid 24 hours to dry between each coat. Once I put down the poly, the water stains on the floor became MUCH more prominent (see below). I’m not sure if there is something I could have done to avoid that.. there probably is. Oh well, it is what it is. Thankfully, they’ll be covered up by a rug!

Overall, I’m really happy with how the floors turned out!! I can’t wait to move onto the next phase in this room: wall treatment!! If we have enough, I’m hoping to use some of the old flooring I saved from the first floor. If not, I have two back up plans. I’ll see you back here next week!
If you want to more updates as we work, come follow along on our instagram!


COMMENT LOVE